Thursday, November 17, 2011

Practice Wedding Cake!!!

This past weekend I was fortunate enough to have not one, but two bridal showers thrown for me (by my maid of honor and a soon-to-be sister-in-law).  I decided to take the opportunity to practice making my wedding cake since there would be plenty of people to eat the cake.

Honestly the hardest part of the whole process was simply baking all the cake.  I have one set of tiered cake pans (6 inch, 8 inch, 10 inch, and 12 inch) and one extra 8 inch pan, so most of the layers had to be done one size at a time, although I did bake a few at once (the 12 inch and the 6 inch, both 8 inches, etc.).  It took me many, many, many hours to do that.  The rest was a piece of cake in comparison (ha, ha, ha....).

There were a few specific things I was practicing or deciding:
1) I wanted to practice stacking the cakes
2) I wanted to decide between fondant and butter cream
3) I wanted to try making my own fondant
4) I needed to decide between using edible pearls or dimensional dots for the scroll work
5) I wasn't sure what I wanted to do with any gum paste flowers

I did a few things in advance that really helped.  I made a marshmallow fondant a few days before hand, as well as a few batches of butter cream icing. I also cut out all my parchment circles and planned out which layers I would bake when ahead of time.  While I was baking, I discovered that 1 batch of batter fills either (2) 8-inch pans or (1) 10-inch pan and (1) 6 inch pan and that a double batch fills both 12 inch pans.

After the cakes were baked and cooled I leveled them and torted each cake in half (except for the 12 inch layers, which I only leveled and stacked for stability).  I filled with cream cheese icing and dirty iced the butter cream layers (the 10 inch and 6 inch layers) on their own cake boards.  After a few minutes in the refrigerator I put the final icing layer on.  While those were in the fridge, I put a boxed Wilton fondant on the 6 inch layer and my marshmallow fondant on the 12 inch layer.  I did not end up stacking the entire cake, just the 12 inch and 10 inch together and the 8 inch and 6 inch together.  I brought each section to a different shower:

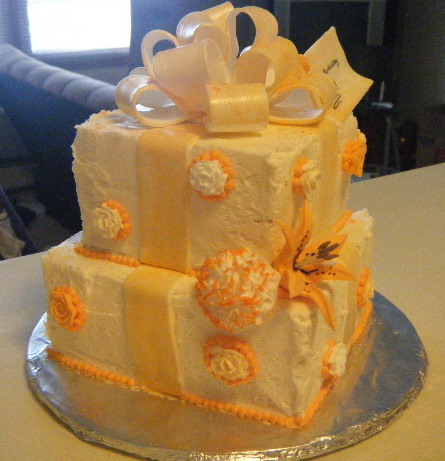
For the top two tiers, I decorated with a green strip of fondant at the base of the top cake (our wedding colors are green and brown).  On the 6 inch tier I drew the swirls on with butter cream and then used a tweezers to fill the line with edible pearls.  On the 8 inch tier I used butter cream to create dimensional dots for the swirls. Since I didn't have my cake topper (a traditional bride and groom used by the women on my mom's side of the family), I filled the top with gum paste roses.
Most people voted for the butter cream icing on this cake and everyone liked the pearls better.  I was unsatisfied with how the ribbon turned out, so I decided to try something different on the next two tiers.


 For the second party, I brought the 12 inch and 10 inch tiers.  I used the pearls on the entire cake, since that was the clear winner from the other day.  I also changed up the ribbon- instead of green, I marbled a strip green and brown.  I was much happier with how it looked (I'll hide the seam behind flowers next time), and so were the people who had been at both showers.  The idea of marbling was actually inspired by my maid of honor, Bethany, so a big thanks to her!!  I also changed up what I did with the roses, and I'm nearly positive this will actually be what I end up doing on the final cake.

This time, it was split about half and half on the marshmallow fondant vs. butter cream icing.  In light of that, I'll probably go with the fondant since I'll be assembling my cake at the reception venue and I feel like it's just a little safer to work with.

I'm so excited to make my actual cake now!!

-Beth


Kitty Cake

I made this cake for a friend's birthday.  As with all my cakes, I still need some work on my writing, but overall I really thought this cake turned out cute.

It's a red velvet cake with a cream cheese filling, chocolate butter cream, and fondant details.

The cake itself is made of two 8 inch rounds.  I torted the body and frosted it.  For the head, tail, and ears, I traced a 6 inch circle onto the 8 inch cake (an arc of the circumferences lined up so that a crescent shape and a smaller circle were made from one large circle if that helps with visualization).  The circle became the head and the crescent became the tail and ears. 

The whole thing just fit on a 14inch cake board and I had to transport it in a moving box, but it got to its destination in one piece and everyone seemed to enjoy it!

-Beth

Low(er) Calorie Version of a Pumpkin Bar

 In an effort to ensure that I fit into my wedding dress when the time comes I've ended up doing a lot of calorie counting.  After I made the last pumpkin bars I was pretty appalled to see the final calorie count per bar (if you turn a 10x13 inch pan into 24 servings it's well over 300 calories a piece). 

I decided to make a few changes and see what I ended up with.  First, I reduced the amount of sugar from 1 and 2/3 cups to 1 cup.  I also halved the amount of oil called for and replaced half of it with unsweetened applesauce.  Finally, in an effort to add some nutritional value, I used whole wheat flour instead of white.

Recipe:

  • 4 eggs
  • 1 cup granulated sugar
  • 1/2 cup vegetable oil
  • 1/2 cup unsweetened applesauce
  • 15-ounce pumpkin puree
  • 2 cups sifted all-purpose flour (I used whole wheat this time)
  • 2 teaspoons baking powder
  • 2 teaspoons ground cinnamon
  • 1 teaspoon salt
  • 1 teaspoon baking soda
The bars were done after about 30min at 350 degrees.  Instead of cream cheese icing I used a cinnamon butter cream(made with water, not cream).  In the end, the bars themselves were about 65 calories "lighter" each, however it turns out the cream cheese icing actually had fewer calories than the butter cream.

Still not a dieters food, but 65 calories is almost the caloric equivalent of 1 mile of walking, so who's complaining?


-Beth

Friday, October 21, 2011

Italian Cheesecake

I don't know what "kind" of cheesecake our good old cream cheese cheesecake is considered, but I recently stumbled across a recipe for an "Italian" cheesecake

This particular recipe called for cream cheese and ricotta cheese. Honestly, I'd never tried ricotta cheese before a few weeks ago, but it's definitely different than anything I'd tried before that time.  The author claims that this particular combination makes the cheesecake "creamy and not thick". 

Since cheesecake is Chris's favorite and he once told me that the cheesecakes I make are not "fluffy" enough I decided to try it.  Clearly we both need to try more desserts as he describes cheesecakes in terms of "fluffiness" and I have little to compare things to.

First off, it struck me as strange that this cheesecake does not have a crust or bottom of any sort.  Next, it was frustrating that the recipe does not state what size pan to bake the cheese cake in.  That being said, it was hard to know when it was finished baking. 

In the end, it turned out pretty good.  It looked really nice and the suggested method of leaving it to cool in the oven for three hours worked well to keep it from cracking (I also baked it in a pan of water).  When I cut it, it was very moist- sticking to the knife and other parts of the cheesecake.   I'm not sure if it was under baked or if that's how it was supposed to be, but it tasted just fine.  It is definitely different from a plain cream cheese cheesecake, but very smooth and light.  I would like to try another Italian cheesecake just to compare and I definitely wouldn't mind sampling some dessert menus.

-Beth

Thursday, October 20, 2011

Pumpkin Bars with Cream Cheese Icing

I was in the grocery store the other day and mid sentence about something to do with tomatoes I noticed they had pie pumpkins out.  I promptly forgot what I was saying and rushed over to the pumpkins leaving Chris hanging on whatever I was oh so important about the tomatoes.  Chris wasn't nearly as excited as I was, but we ended up going home with a pumpkin.

The puree from one pumpkin supplied me with enough pumpkin for bars, a pie, and pumpkin spiced lattes.  For now, the pumpkin bars. 

I used a recipe from the Food Network's website.  I've never made a bad recipe off their site and this was no exception.  The bars came out moist, dense, and perfectly done in the allotted time.  I did add a few dashes of nutmeg and ground cloves since just cinnamon seemed a little plain.  I've never made pumpkin bars before but I've sampled plenty- these were by far the best I've tried.  I brought them to school and left them in the teacher's lounge. They were gone before lunch.

A friend of mine has a special spot in her heart for the seasonal pumpkin spice lattes at the coffee shops, so we decided to give homemade ones a try.  I used this recipe.  It tasted wonderful.  I wasn't a fan of the pumpkin "pulp" that settled to the bottom of the mug, but my friend didn't seem to mind.

Simple Chocolate cake

The weekend after I moved into my new apartment, Chris and I had my parents over for dinner as a thank you for helping with the move.  I figured if we were having dinner then dessert was a must.  I seem to be in a cake rut lately, so cake it was.  Both my parents like chocolate, so I made a chocolate cake with chocolate cream cheese icing.

 The icing has cocoa powder and shaved chocolate in it.  I also put chocolate chips as a boarder along the edge of the cake.  I'm in the process of using up all the extra decorations I have left over from my cake courses, so I had my pick of gum paste and fondant flowers.  In the end, I didn't feel like getting out any butter cream to make leaves or vines or anything else that would go with a bunch of flowers, so I stuck a daisy on it and called it good.  Not an amazingly spectacular cake (and not very good lighting for the pictures) but it tasted good and worked for a short order desert.

All About Strawberries

I made this cake for a special friend of mine's 50th birthday.  He loves strawberries so that was the theme for this cake, inside and out.  


I used a white almond cake recipe to make two 10'' cakes, torted them, and layered a strawberry puree in between the layers.  The butter cream icing is strawberry flavored as well.  I used an piping gel transfer to outline a strawberry on the cake and filled it in with more icing.  I happened to have some brown sprinkles on hand, so I used those for the strawberry seeds.  The strawberries on the side are gummy strawberries that I "glued" on with more butter cream.  

Overall, I was absolutely pleased with this cake.  The only hitch I ran into was that the strawberry flavoring was colored a very dark red.  The end result was a slightly pink tint to the frosting. I ended up using less than I would have liked because I didn't feel a bright pink cake was going to appropriate for non-feminine cake as sexist as that might sound.  I was unfortunately not able to be there to taste the cake or celebrate the birthday, but everyone told me it was excellent.  One of my co-workers swore to me it was "seriously the best cake [she's] ever tasted".

Cake Pops!

Yay cake pops!  I actually made them into pops this time and everything.  This was also the last project I did at my old studio apartment so that's exciting too!

I used left over cake tops from the cakes I've made in the last two cake courses (and everything in between there).  It ended up being a ton of cake- way more than I anticipated....  So I ended up throwing a lot of it out unfortunately.  That being said, it was a nice selection of cake flavors.  I had almond pound cake, vanilla cake, chocolate cake, and red velvet. 

I used chocolate butter cream icing for the red velvet and chocolate cake and vanilla butter cream for the other flavors.  I also had a variety of candy coating.  The picture above shows chocolate and cherry, I also had vanilla but didn't have any completed at the end of the night (and I finished the rest in transit at Chris's apartment, not my best show of time management skills). 

The first few pops I made I used ribbon to tie off.  They definitely looked nice, but it was taking way too long so I switched to colored electrical tape instead.  In the end I learned a couple of things- first, never ever start a project the afternoon before you move; second, the bigger the pop, the bigger the probability the candy won't be enough to keep it on the stick; third, the ribbon looked nice and worked well, but the tape worked just as well and was a ton quicker; finally, using a foam floral arranging ring (from the dollar store) was a really handy way to allow the pops to set up.

To be honest, the cake pops weren't my favorite, but everyone else who tried them said they were great.  My soon-to-be brother-in-law was very disappointed that he was left only one to try by his parents.

Saturday, September 17, 2011

Special order cake!!

The fondant covered cake that I brought into school went over so well that someone asked me if I could make a cake for her daughter's birthday later in the week!  I was pleasantly surprised to find out that everyone had just assumed someone had picked up a bakery cake until they heard a friend of mine talking about it.

She requested a 6 inch cake with lots of chocolate and roses. I decided on a devil's food chocolate cake mix, whipped dark chocolate ganache for the filling, and chocolate butter cream for the cake.

Originally I had made both larger roses for the top of the cake and smaller roses to decorate the sides with, however after putting on the pattern and the top roses I decided it would look too crowded with the mini roses. In the end, I was really pleased with the end product.

The person I made it for said it went over really well at the birthday party and said the whipped ganache was wonderful.  I'll have to make one to taste soon!

P.S.  This was the last baked good I made in my studio apartment!  Yay for a bigger, better kitchen next time!

Wilton Gum paste and Fondant Class

Unfortunately I was not great at taking pictures of everything we learned to do in this class.  I learned to make roses, carnations, and mums.  I think I used both the roses and carnations on the orange birthday cake I made but we never really came back to those. 

On the last day of class we covered a cake in fondant.  I made an almond cake with strawberry filling again.  Since the class was just a few days before all the teachers came back to school where I'm serving I decided to make a "Welcome Back" cake.  I used mums because they are season (and they were the least time consuming of all the flowers). 

I loved how the fondant looked!  I was seriously doubting that I would want to use fondant for my wedding cake, but I'm now reconsidering.  It will take a few more trials to know for sure, but as of now I can definitely see the advantages.  I also cut strips of brown fondant to make stripes along the side and then twisted two ropes of green for a boarder.  The cake is on a cake board covered with marbled fondant.  Even if I do end up going with buttercream on my wedding cake, I will most likely be using this technique for my cake board because it looked really nice.

Saturday, September 3, 2011

Sugar Cookies with Champagne Icing


After my last cake I had a lot of champagne icing leftover so I decided to make some sugar cookies to frost. 

Possibly my favorite cookies in the world are the frosted soft sugar cookies from Cub (I'm sure every grocery store has them). The recipe I used for the cookies was wonderful- exactly what I had in mind and with the champagne icing a definite rival for my favorite.

After having so much trouble with icing consistency the last time I used it, I added almost a cup of powdered sugar and a tablespoon or meringue powder. This time it worked great! It was easy to spread and it set up nicely so I could stack the cookies without getting hard.

I added some pink sugar sprinkles for fun! This was the first treat I brought to my new co-workers and they were definitely a success.  Plus I think everyone gets a kick out of having champagne in their icing, despite that it's a nominal amount ; ).


Saturday, August 27, 2011

Pink Champagne Cake

I recently had one of my younger sisters over for the night.  Being the cool big sister that I am (right...) we baked a cake since there's really not much else to do at my apartment.  We settled on a pink champagne cake.  

The recipe was pretty simple- you start with a box cake mix and add champagne instead of water.  What I had forgotten was just how pathetically thin the layers of a box cake end up being.  Instead of settling for a squat cake I made another batch but decided not to color it pink. In the end, I'm really glad it happened that way because it looked really cool.

Although I didn't realize it at the time, the icing was just a glorified butter cream recipe with champagne instead of water or cream.  When I iced this cake I was frustrated that it didn't crust- only later did it dawn on me that butter cream crusts because of the meringue powder.  I used pureed strawberries as a filling between the layers and iced it with the champagne butter cream.  My sister was very interested in how roses were made, so I decided to make more mini roses and use them on the cake.  I had just learned how to do reverse shells in a cake class so I tried those as well. As seen in the picture I have some work to do, though in my defense, the icing was almost too thin to hold its shape.

In the end, I really liked this cake.  I brought it home when I dropped my sister off and everyone was very approving.  Next time I'll definitely use meringue powder in the butter cream and concentrate a little harder on my shells.
-Beth

Tuesday, August 16, 2011

Orange is the color of the day.

One of my younger sisters recently asked me to make a birthday cake for a friend of hers.  The only request she made was that it be orange.  With that in mind, I also had the opportunity to use a couple of decorations I made in my recent Wilton decorating class.

I used the same almond cake recipe that I had used in my most recent tall cakes and used the same filling (sweetened strawberry puree and sure-gel) since it had turned out so well last time.  I made 2 10inch cakes and 2 8 inch cakes (round) and trimmed them into square cakes that were approximately 7.5 inches and 6 inches.

I realized a few things making square cakes from circles.  First, remember that geometry we learned in high school? Yeah the whole triangles inside circles and Pythagorean theorem thing they swore we would use and we were pretty sure we wouldn't?... Well it turns out that did come in handy. Second, I found out that it's really difficult to get right angles without a reference, and even then if you're the teensiest bit off on each one, you're a whole lot off in the end.  Finally, using butter cream on corners is messy business, but my class instructor just explained a method that I will definitely be trying the next time I do this.

The bow and carnation were things we made in class recently.  To color the bow orange I mixed glimmer dust (edible) with vanilla extract and painted it on.  I wasn't entirely happy with how it turned out, but I had made it white in class so it was either that or thin down some gel colors.  I painted some water onto the tip of all the petals on the carnation and rolled in in the shimmer dust as well.  I used a tip 5 to make all of the dots and tips 5 and 101 to make the mini roses. For the gift tag I used rolled fondant and an edible marker. 

I was not there when the cake was eaten, however my sister assured me that everyone enjoyed it.

-Beth

Saturday, August 13, 2011

Wilton Tall Cakes class

After smoothing over my royal icing disaster
Posting on my "tall cakes" class seems to have eluded my attention up until this point.  In the midst of taking the Wilton flowers class I spent three hours on a Saturday afternoon learning how top properly stack cakes.  I guess I had always assumed that it would be as simple as placing one cake on to of another, however that was not the case. I'm sure with your basic box cake recipe you could safely stack any way you choose, but as soon as you move onto denser cakes and more layers, I can see why you would want more support.

I brought in a 6 inch and an 8 inch double layer cake.  Stacking them included placing dowels in the lower level of the cake (the 8 inch tier) and leaving the top tier on its own cake board.  I also didn't know that to cut a stacked cake, you are supposed to remove each layer before serving it.  Lots of little details.  We were supposed to bring things for decorating to class, so I brought a lot of the flowers from the class I was taking. 

Originally I had planned to do flowers on the top and practice one technique for putting music notes and a staff on the bottom, but using royal icing wasn't as easy as I'd hoped. First of all, I had to kneel on the floor the entire time I was attempting to draw the lines for the staff on.  Second, I either need stronger hands or a thinner icing because it was very hard to lay down an even, steady line. Finally, I had colored the icing with Wilton black gel color and it turned out an oily purple instead of black... In general I just wasn't at all happy with how it was turning out.  I ran out of time in class to finish anyway, but when I got home I scraped the idea and used more flowers.

Because royal icing dries hard, it was relatively easy (with patience) to remove what I had applied to the cake.  A fresh coat of buttercream smoothed over the whole mess.  I finished it off with another cascade of flowers and another round of dimensional dots. 

Final product!
A few more notes about this cake.  First, I still need to work on shells- definitely an improvement over my last attempt, but just not quite there.  Next, I need more practice on centering when I stack, so expect more posts on tall cakes! Finally, I used a recipe given to me by my Wilton instructor and it was great!  I loved how tall the individual layers were and that one recipe made enough for both tiers. For the filling I used pureed strawberries- the end result tasted very much like a strawberry shortcake!  The only thing I would change is the icing I used.  Instead of butter and vanilla flavoring I used almond to match the cake.  It was good, but very sweet (not just my opinion).  Next time I will probably put half the amount called for and use vanilla for the rest.

The top half of the cake was consumed at my staff meeting for once (first time I've brought anything with me) and the bottom half was sent to work with Chris.  Everyone seemed to really like it.

Saturday, July 30, 2011

Irish Soda Bread


 This is another recipe from the bread book I bought the other day.  I've never tried Irish soda bread before, so I really have no reference as to whether or not the flavor and density were on.  That being said, I did really like it.  I have a soft spot in my heart for crusty breads, and this definitely fit the bill.  This is also the first non-yeast bread I've made and I was impressed how well it rose.


The one issue I had in making it was the stickiness of the dough.  After I added all the required flour it was still unmanageably sticky.  I didn't want to add flour because the directions warned against making dough that was too stiff.  I ended up using a generous amount of flour on my hands when I rolled the dough into balls and that seemed to work alright, but I didn't really get to knead it because it was sticking to everything and any flour on the counter just got worked into the bread right away anyway.  I looked up a video online and the the dough didn't look nearly so sticky so I'm not sure if it was my particular recipe; it's possible it was just really humid that day.  We have had dew points in the70s-80s lately and I know it's really impacted the stiffness of my icing.

-Beth

Friday, July 29, 2011

Roulade (or roll-a-log if you're Chris...)

I made a roulade not too long ago.  It was supposed to have a chestnut filling, but I didn't feel like spending the time or money trying to find chestnut puree so I improvised with what I had on hand. 

Making the roulade itself felt really similar to making a torte- lots of sugar, eggs, and chocolate and not a whole lot else.  I did not have the suggested pan to use, so I just used a baking sheet with deeper sides and that seemed to work.  What I ended up with was what resembled a shallow sheet cake.  I made a filling out of whipping cream, peppermint extract, and a little bit of powdered sugar and cocoa powder.

Rolling the roulade was pretty easy, but I would have liked to let the cake part set for overnight like suggested, since it was really soft.  I didn't end up rolling it as tightly as I would have liked because of that, but it still tasted great.  I sent it to work with a friend of mine who works in a nursing unit and she said everyone liked it there too.

-Beth

A foray into the world of breads


While wandering through Barnes and Noble the other day I came across a marvelous little section of clearance books devoted entirely to the culinary arts. It was a miracle I left with only one book.... In any case, I picked up a book that featured 100 artisan bread recipes.

The first recipe I tried was called "Cottage Bread".  It was a very dense bread and it tasted wonderful smothered in butter. Obviously not a sandwich bread, but very good with dinner.

-Beth

Wilton Flowers and Cake Design in a nutshell

I took another 4 week Wilton course through Michael's in July.  This month was "Flowers and Cake Design".  I really enjoyed the opportunity to learn what even more of the decorating tips I have are used for, and of course the chance to learn how to create a few beautiful flowers.

In the first class we worked on using gum paste and fondant. We made two flowers, a button flower (fanciful) and a pansy (more lifelike).  They were both relatively easy, however it felt almost out of place in the class since we worked with royal icing for the next 3 weeks.

We learned how to make a variety of roses. From left to right pictured below: the Wilton rose, a primrose, and rosebuds. I also improvised an made mini roses.  For some reason the mini ones were a lot easier to make and they turned out adorable.


In addition to the roses, we also worked on apple blossoms, daffodils, violets, and lilies. I found I was decent at making everything except the primroses.  For some reason I never did get the shape of the petals the way I wanted it to look.

We used stiff royal icing for everything.  I think it's a pain to make- it took me the better part of an hour to make a few batches- but it was much easier to work with.  I'm also going to assume that having a stand mixer would definitely speed up the process, or at least make it so I could do  something else while it mixes for ten minutes.

I once made a batch that turned out like fondant.  I'm not quite sure what went wrong, but I plan on using it to frost cookies.  It's almost the consistency of play dough so I should be able to think of something fun to with it.

The last day of class was devoted to decorating our final cakes with all of our flowers and learning a few more flowers not taught during the course of the class. We learned how to make another type of pansy with royal icing and also how to make another version of a mum.

I think I spent the better part of a morning and afternoon making extra flowers to use on the cake.  I tried making a few tiger lilies just to see how it would turn out, and I think it looked pretty realistic. The cakes I've been making lately have been practices for my wedding cake.  I believe I found the recipe I would like to use (it's by Martha Stewart).  Chris even liked it, and he's generally not a fan of cake.  The dimensional dots on the side are also an idea I've been toying with for the cake, only I think I might try it with edible pearls instead.  Overall, I was really please with how this cake turned out.


-Beth


Wednesday, July 27, 2011

Peach Cobbler

I've never made a cobbler before and I've never done anything with peaches other than eat them as they are.  That being said, I had a lot to learn before I could even attempt a peach cobbler and  I have a lot more to learn before I make another.

First off, the peaches in peach cobbler are skinless, so how do you peel a peach?  You don't.  You blanch it and the skins pretty much fall off.  I didn't know what blanching was, but it turned out pretty easy.  Basically you drop a scored peach into boiling water for about 45 seconds and then immediately stick in a bowl of ice water. When it's cool, the skin pulls off easily from the score marks you made. 

Next, you obviously do not want pits in your cobbler... A word to the wise here.  Peaches bruise super easy, and once they are bruised they turn to mush and become very difficult to work with further.  Pitting a peach, according to many internet sources, involves cutting a peach along a diameter down to the pit and then simply twisting both sides of the peach in opposite directions.  Whoever made that work is either using magic or forgot to mention some things in their directions.  The first poor peach I tried this on was in a sorry state after about 15 seconds.  For the rest of the peaches, I sliced away the ends first, exposing the pit, and then sliced along the pit get individual slices off. 

After all of the peach shenanigans, making the cobbler was easy.  Basically the peaches get combined with sugar and cornstarch and then topped with a soft dough that's simply dropped on.  It turned out wonderful.  Don't let the picture fool you!  If I had served warm out of the oven as suggested it would have been picture perfect, however a day in the fridge left the peaches soupy and the breading spongy. It did however, still taste wonderful.

-Beth

Filled Cookie Bites

 I'm not sure what I was thinking the day I tried these, but in lieu of making cookies I decided to cookie bites in a mini muffin pan.  And in lieu of just cookie bites, I decided to try "filling" them with caramel, chocolate, or peanut butter.

It's not a difficult idea to conceive- and I certainly didn't see any reason why it wouldn't work.  I started by putting a layer of cookie dough in the bottom of each cup and making a well to hold the filling of choice.  After adding the filling I put another layer of cookie dough on top and smoothed it out.

I baked the cookies (I used my recipe that I posted a while ago) at 350 until they were golden brown. When I took them out, they looked great.  After 3 minutes out of the oven, they were sadly caved in and significantly less attractive.  That being said, they tasted great.  The caramel ones were a huge headache to make (the caramel was hard to cover with the top layer of cookie dough) and there were a struggle to get out of the pan, but they were the only ones that didn't cave in completely. 

If I make these again, I would try the following changes: 1) I would use caramel candy instead of caramel topping, 2) I would roll the bites in my hands before pressing into the cups to make sure all of the air was out of the center with the filling, 3) I'll probably add 1/2 cup of flour to the dough to make sure it can support it's own weight, and 4) I'll bake at 325 and for slightly longer to give the whole bite time to bake without burning.

 Everyone who tried them loved how they tasted, but the visual appeal just wasn't there.  When I made brownie bites a quick fix for sunken tops was to fill it in with ganache, but I'm hesitant to frost a chocolate chip cookie.  When I searched for solutions online, every recipe I found for cookie bites involved putting different "fillings" on top, not inside the cookie.  Here's to experimentation in the future then.

-Beth

Wednesday, June 29, 2011

Super Dad to the rescue

Father's Day happened to be just a few days after a midnight S.O.S call to my dad when the chain on bike broke on my home from work in the middle of a not-so-nice NE Minneapolis neighborhood. In the spirit of the rescue, I made my dad this cake for Father's Day.

I was stumped for gifts to begin with (how do you buy something meaningful for someone who receives the typical gifts from 7 daughters and a son every Christmas, birthday, and Father's Day?) so this was the perfect opportunity to step outside realm of ties and power tools and try something a little more creative.

My dad's favorite flavor is butterscotch.  It has been as long as I can remember- late night dessert trips as a kid inevitably ended up with a butterscotch Dilly Bar at DQ.  I've never heard of a butterscotch cake, but I was sure it had be done.  It ended up being as easy as adding butterscotch pudding to a yellow cake mix and making adjustments for consistency.

To add more butterscotch, I decided to make a butterscotch ganache for the center icing.  That ended up being easier said than done.  I ended up using half and half instead of whipping cream because that's what I had on hand.  Unfortunately half and half is very hard to whip and the stickiness of the butterscotch did nothing to help matters.  I ended up making a very wide dam of butter cream icing and just pouring the butterscotch ganache on top.  I didn't have too much trouble with leaks, and it definitely still tasted wonderful.

I was able to use some of the Wilton techniques for the design that made decoration pretty simple.  All of the icing is a basic butter cream.  I used a piping-gel transfer to get the image where I wanted it and used a star tip to fill in the spaces.  I got the idea from a cake I saw online; it was done with fondant, so it looked a lot different, but I thought icing worked well.  There were two things I need to work on with icing.  First, I'm still not great at smoothing the icing out after it crusts.  It turned out relatively smooth, but not as good as it could have been.  I also need to work on colors.  I intended the blue to be a dark blue and the red to actually be red, not dark pink, but it seemed like no matter how much gel I added, the colors weren't getting any darker. 

On the plus side, I am most definitely getting faster at designing and icing a cake.  For my decorating classes (and my Easter cake) decoration took several hours.  I'm pretty sure I pumped this out in 45min.

-Beth


Thursday, June 23, 2011

Oreo Double Whammy

I've been in somewhat of a baking-rut lately.  Between job interviews, dentist appointments, helping my parents install a deck on their house, and an inconvenient work schedule I ended up going a few weeks without time to try anything new.  I attended a friend's wedding about a week ago and had the opportunity to catch up with some other friends who were in town for the weekend.  What better way to bake than to bake for someone?

As I was walking around Target with one of my residents at work, I was struck by an Oreo craving.  Not wanting to cave and purchase a pack of Oreos that would likely end up sitting in my cupboard for a few months after I had a few, I decided to bake with them. 

I've posted on an Oreo Cheesecake before, and I did indeed use the same recipe.  The only change I made this time was size; I really do believe that anything that is good, is better mini in the baking world.  Instead of using a spring-form pan, I used muffin tins.  Using the same technique as I did with the cake bites, I placed strips of parchment paper in the tins before pressing the crust in.  The baking time was cut down to about 17 minutes. 

I also used mini-Oreos as the decoration on top.  While making the crust, I reserved the Oreo filling this time, since it really didn't seem to add much to the crust itself, and I had other things in mind for it...

Like Oreo filling for an Oreo cake! I have to admit that I used a box-cake for the chocolate cake part of this.  I was both in a pinch for time and feeling lazy.  Essentially, I took all of the Oreo filling out of an entire pack of Oreos, mixed it with enough cream cheese and sugar to make it spreadable, and used it as the center filling between two eight inch chocolate cakes.  I made a vanilla butter-cream frosting to ice the cake and used mini-Oreos and crushed Oreo cookies for the decorating.  My only complaint was that it was SUPER sweet... like an Oreo cookie I suppose.  I would definitely consider making this recipe again with minimal changes.  I really like how it ended up looking!

Best Chocolate Chip Cookie Recipe (for now)


This was really the first recipe that I can claim as my own.  I used a standard chocolate chip cookie recipe, probably off of a Nestle bag, and made enough changes where I can confidently say they are nothing like the original cookie. Here's the recipe:
  • 2.5 cups flour
  • 1 cup brown sugar
  • 1/2 cup white sugar
  • 3 tsps vanilla
  • 1/2 cup vegetable shortening
  • 1/2 cup softened (room temperature) butter
  • 1 tsp baking soda
  • 1 tsp baking power
  • 3 eggs
  • 3 Tbl corn syrup
  • Chocolate chips, M&M's, or other candy to taste (10-14oz)
Combine dry ingredients except for sugars and set aside.  Cream shortening, butter, and sugars until light and fluffy.  Gently beat in vanilla and eggs. With the mixer on medium-low, add dry ingredients until smooth.  Mix in your candy of choice by hand. Drop dough onto ungreased cookie sheet using a 1/2 Tbl as a guide for size.  Bake for 8 min at 350 degrees.  Cookies will appear slightly golden and will brown on the pan.  Let sit for 3 min before moving to a wire rack.

There are a few things about this recipe that I think make it special.  First, I added more flour and divided the fats between vegetable shortening and butter.  Theses changes help produce a cookie that has some substance to it, instead of being completely flat.  I've found that it also helps hold the candy in the cookie instead of letting it all sink to the bottom.  Next, I use about 2x the amount of vanilla as the original recipe, which gives it a very smooth flavor, and is supposed to make the inside softer. I also upped the ratio of brown sugar to white sugar and added corn syrup which I feel gives the cookie a chewy inside.  I'm not an expert on what all of the changes do in specific, but I do know that this is one good little cookie.


Basic Cinnamon Rolls

I've been making this cinnamon bun recipe for a few years now and I haven't really felt the need to tweak much.  The only real change I routinely make is adding a dash of nutmeg and cloves to the cinnamon-sugar mix.
The first time I made the recipe, I sincerely thought it was not going to work.  During the entire rising process (the initial dough rising, letting them rise in the pan, and then letting them rise after leaving the fridge), the dough didn't really change much.  However, they easily doubled their size during baking. Other than that, I always keep an eye on them during baking.  I don't know if it's my oven or not, but the baking time isn't as long as the suggested time.

I've used a different icing each time, depending on what I have on hand, but my favorite has simply been cream cheese, a little cream, and powdered sugar.

Chicken Pot Pie

Occasionally I do try to go beyond just traditional "baking".  I make this chicken pot pie frequently.  It's relatively quick, easy, and absolutely delicious.  This is one of my favorite meals and I love having left overs!

I use this recipe as a base and then add whatever I have around the kitchen as far as extra veggies go. I always add a potato or two and usually corn as well.  I use a crust recipe from Simply Recipes and add garlic and onion salt to the mix (otherwise the crust ends up pretty bland).  One tip with the crust is to make sure the filling has cooled before putting on the top crust, otherwise the crust melts and disintegrates leaving holes.

I have also substituted cream of chicken soup for the chicken broth when that's what I happen to have on hand.  I think both ways work just fine, but you do need to thin down the cream of chicken soup if that's what you end up using.

-Beth