Wednesday, June 29, 2011

Super Dad to the rescue

Father's Day happened to be just a few days after a midnight S.O.S call to my dad when the chain on bike broke on my home from work in the middle of a not-so-nice NE Minneapolis neighborhood. In the spirit of the rescue, I made my dad this cake for Father's Day.

I was stumped for gifts to begin with (how do you buy something meaningful for someone who receives the typical gifts from 7 daughters and a son every Christmas, birthday, and Father's Day?) so this was the perfect opportunity to step outside realm of ties and power tools and try something a little more creative.

My dad's favorite flavor is butterscotch.  It has been as long as I can remember- late night dessert trips as a kid inevitably ended up with a butterscotch Dilly Bar at DQ.  I've never heard of a butterscotch cake, but I was sure it had be done.  It ended up being as easy as adding butterscotch pudding to a yellow cake mix and making adjustments for consistency.

To add more butterscotch, I decided to make a butterscotch ganache for the center icing.  That ended up being easier said than done.  I ended up using half and half instead of whipping cream because that's what I had on hand.  Unfortunately half and half is very hard to whip and the stickiness of the butterscotch did nothing to help matters.  I ended up making a very wide dam of butter cream icing and just pouring the butterscotch ganache on top.  I didn't have too much trouble with leaks, and it definitely still tasted wonderful.

I was able to use some of the Wilton techniques for the design that made decoration pretty simple.  All of the icing is a basic butter cream.  I used a piping-gel transfer to get the image where I wanted it and used a star tip to fill in the spaces.  I got the idea from a cake I saw online; it was done with fondant, so it looked a lot different, but I thought icing worked well.  There were two things I need to work on with icing.  First, I'm still not great at smoothing the icing out after it crusts.  It turned out relatively smooth, but not as good as it could have been.  I also need to work on colors.  I intended the blue to be a dark blue and the red to actually be red, not dark pink, but it seemed like no matter how much gel I added, the colors weren't getting any darker. 

On the plus side, I am most definitely getting faster at designing and icing a cake.  For my decorating classes (and my Easter cake) decoration took several hours.  I'm pretty sure I pumped this out in 45min.

-Beth


Thursday, June 23, 2011

Oreo Double Whammy

I've been in somewhat of a baking-rut lately.  Between job interviews, dentist appointments, helping my parents install a deck on their house, and an inconvenient work schedule I ended up going a few weeks without time to try anything new.  I attended a friend's wedding about a week ago and had the opportunity to catch up with some other friends who were in town for the weekend.  What better way to bake than to bake for someone?

As I was walking around Target with one of my residents at work, I was struck by an Oreo craving.  Not wanting to cave and purchase a pack of Oreos that would likely end up sitting in my cupboard for a few months after I had a few, I decided to bake with them. 

I've posted on an Oreo Cheesecake before, and I did indeed use the same recipe.  The only change I made this time was size; I really do believe that anything that is good, is better mini in the baking world.  Instead of using a spring-form pan, I used muffin tins.  Using the same technique as I did with the cake bites, I placed strips of parchment paper in the tins before pressing the crust in.  The baking time was cut down to about 17 minutes. 

I also used mini-Oreos as the decoration on top.  While making the crust, I reserved the Oreo filling this time, since it really didn't seem to add much to the crust itself, and I had other things in mind for it...

Like Oreo filling for an Oreo cake! I have to admit that I used a box-cake for the chocolate cake part of this.  I was both in a pinch for time and feeling lazy.  Essentially, I took all of the Oreo filling out of an entire pack of Oreos, mixed it with enough cream cheese and sugar to make it spreadable, and used it as the center filling between two eight inch chocolate cakes.  I made a vanilla butter-cream frosting to ice the cake and used mini-Oreos and crushed Oreo cookies for the decorating.  My only complaint was that it was SUPER sweet... like an Oreo cookie I suppose.  I would definitely consider making this recipe again with minimal changes.  I really like how it ended up looking!

Best Chocolate Chip Cookie Recipe (for now)


This was really the first recipe that I can claim as my own.  I used a standard chocolate chip cookie recipe, probably off of a Nestle bag, and made enough changes where I can confidently say they are nothing like the original cookie. Here's the recipe:
  • 2.5 cups flour
  • 1 cup brown sugar
  • 1/2 cup white sugar
  • 3 tsps vanilla
  • 1/2 cup vegetable shortening
  • 1/2 cup softened (room temperature) butter
  • 1 tsp baking soda
  • 1 tsp baking power
  • 3 eggs
  • 3 Tbl corn syrup
  • Chocolate chips, M&M's, or other candy to taste (10-14oz)
Combine dry ingredients except for sugars and set aside.  Cream shortening, butter, and sugars until light and fluffy.  Gently beat in vanilla and eggs. With the mixer on medium-low, add dry ingredients until smooth.  Mix in your candy of choice by hand. Drop dough onto ungreased cookie sheet using a 1/2 Tbl as a guide for size.  Bake for 8 min at 350 degrees.  Cookies will appear slightly golden and will brown on the pan.  Let sit for 3 min before moving to a wire rack.

There are a few things about this recipe that I think make it special.  First, I added more flour and divided the fats between vegetable shortening and butter.  Theses changes help produce a cookie that has some substance to it, instead of being completely flat.  I've found that it also helps hold the candy in the cookie instead of letting it all sink to the bottom.  Next, I use about 2x the amount of vanilla as the original recipe, which gives it a very smooth flavor, and is supposed to make the inside softer. I also upped the ratio of brown sugar to white sugar and added corn syrup which I feel gives the cookie a chewy inside.  I'm not an expert on what all of the changes do in specific, but I do know that this is one good little cookie.


Basic Cinnamon Rolls

I've been making this cinnamon bun recipe for a few years now and I haven't really felt the need to tweak much.  The only real change I routinely make is adding a dash of nutmeg and cloves to the cinnamon-sugar mix.
The first time I made the recipe, I sincerely thought it was not going to work.  During the entire rising process (the initial dough rising, letting them rise in the pan, and then letting them rise after leaving the fridge), the dough didn't really change much.  However, they easily doubled their size during baking. Other than that, I always keep an eye on them during baking.  I don't know if it's my oven or not, but the baking time isn't as long as the suggested time.

I've used a different icing each time, depending on what I have on hand, but my favorite has simply been cream cheese, a little cream, and powdered sugar.

Chicken Pot Pie

Occasionally I do try to go beyond just traditional "baking".  I make this chicken pot pie frequently.  It's relatively quick, easy, and absolutely delicious.  This is one of my favorite meals and I love having left overs!

I use this recipe as a base and then add whatever I have around the kitchen as far as extra veggies go. I always add a potato or two and usually corn as well.  I use a crust recipe from Simply Recipes and add garlic and onion salt to the mix (otherwise the crust ends up pretty bland).  One tip with the crust is to make sure the filling has cooled before putting on the top crust, otherwise the crust melts and disintegrates leaving holes.

I have also substituted cream of chicken soup for the chicken broth when that's what I happen to have on hand.  I think both ways work just fine, but you do need to thin down the cream of chicken soup if that's what you end up using.

-Beth

Apples, Craisens, and Candied Walnuts

I love apple pie!  Whenever apples are on sale at Cub I try to make a pie.  So far I've been pretty successful, no matter the kind of apple, with a little adjustment of sugar to match the tartness or sweetness of the apple.  This time it was Braeburns.

I was also in the mood for exploration, so I tried three new things.  First, I wanted to add a bit of tang to the pie since Braeburns are one of the sweeter baking apples, so I tried adding dried cranberries (craisins).  I also wanted to add more texture to the filling, so I made some candied walnuts and added those as well.  For the final touch, I made my first full-size lattice crust. 

The most time consuming part of the entire baking process was making the candied walnuts.  In the end, it would have been way easier to just buy candied walnuts, but where would the fun be in that?  I used this recipe from AllRecipes.com.  I was very grateful to have a candy thermometer handy, since everything I've tried in the past going by "soft ball" stage and the like has been pretty hit or miss. In all reality, the only problem I had was baking the walnuts, which you would think would be the simple part.  I'm pretty certain I ended up under-baking them because I was terrified of burning them.  I've watched enough cooking shows and heard enough warnings to know that burning nuts is bad business (they smell bad and are entirely unsalvageable).  That being said, they still had a "crunch", it was just more of a crunch from the candy coating than the nut itself.  In the end, the leftover nuts were an irresistible snack and I'll definitely be giving nuts more attention when the holidays come around.

The pie itself turned out fantastic.  The flavors from the apples, craisins, and walnuts was great, and the walnuts really added a nice touch of crunch to the overall smooth texture of the apples.  I sent most of this pie to work with Chris, and they all seemed to enjoy it.  The lattice crust was pretty easy to make, although next time I'll put a little more forethought into getting everything centered first (moving the pieces was not easy when I misplaced something).

-Beth

Cake bites: a messy solution to cleaning up.


During the Wilton decorating class I took, our instructor recommended that we save all of the extra pieces of cake from our projects (the leveled tops, crumbs, etc.) and freeze them for future use in cake pops.  I had never heard of such a thing, but a quick look around the blogging world revealed they were/are all the rage.  I'm not quite creative enough yet (and naturally, too impatient) to make "pops" which seem to require a lot of time letting things chill and set, so I took things in a different direction.

Basically, all you do is combine the cake pieces with some icing and shape them however it pleases you.  More specifically, I used chocolate cream cheese icing and blended my thawed red velvet cake tops into it.  Since I didn't want to make "pops", I made "bites".  I thought it would be as simple as pressing the icing-cake mixture into mini muffin tins, and with a little forethought I thought I saved myself a world of trouble.  I cut parchment paper strips and placed them in each muffin tin in hopes that they would allow me to easily remove the bites while retaining their shape.

There was really nothing "easy" about it in the end.  The icing-cake mixture had the consistency of play dough and didn't have much shape retention to speak of.  After several failed attempts to pull the bites out, I froze the whole pan and tried again with only a little more success.They ended up turning out just fine, however it was quite the struggle to pull them out without ruining them.


In the end, I did really like what came out of it.  The bites were smooth and creamy and just the right size both to decorate and eat.  I think I enjoyed the decorating portion most out of the whole process.  I have lots of photographic evidence:


By the way, I've decided that I really don't like the options available for editing this blog format.  I've tried changing the settings, but nothing seems to help.  I also cannot simply drag and drop pictures into position.  For instance, the smaller pictures at the bottom of this post are in nice little rows of three all the way down; unfortunately they don't keep that formatting after hitting "publish".  Oh well, more monkey work to do with it.

-Beth


Monday, June 20, 2011

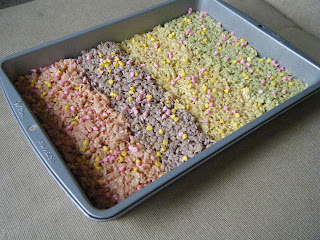
Rainbow Rice Crispies

Few things top a classic rice crispy bar in my mind when it comes to simple desserts.  I don't care much for rice crispys that have been jazzed up- no peanut-butter-chocolate-chip-with-banana for me please, just plain old rice crispy cereal in marshmallows thanks.  However, that doesn't mean they can't take on a twist. 

I'm sure you could dye your treats to whatever color you choose, but these came about when the urge to bake took me at a time when pretty much all I had available was half a box of cereal and a bag of pastel bunny-shaped marshmallows I had purchased after Easter (who could pass up a bag of marshmallows for 25¢?).  Originally I was going to simply mix them all together, but after envisioning a nasty brown color that I imagine the combination of purple, pink, yellow, and green would result in, I divided my recipe into fourths and separated the colors.  It ended up looking pretty neat, especially with some Nestle "toppers" (also on post-Easter sale for pennies). My younger siblings loved that they were different and the adults thought it was a cute twist.  Next time I'll try shapes.

-Beth

Sunday, June 19, 2011

Easter Basket Cake (first attempt at decorating with direction!)

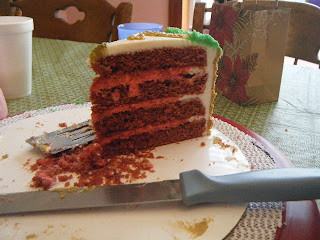
Easter happened mid-way through my cake decorating class and naturally I was eager to put my new-found skills to the test.  Thankfully I'm usually charged with dessert (and dinner rolls) for my family's Easter dinner.  I decided to make a cake so I could decorate it (in the past I've brought tortes and pies).  Naturally I tried yet another red velvet recipe.  I'm pretty sure I really did find the winner for my wedding cake recipe this time- not only was it a very rich red color (the other cakes were definitely more brown than red), it was still moist and delicious after three days in the fridge. As I'm sure the week leading up to a wedding is bound to be a crazy time no matter how organized I intend to be, longevity will be my friend.

I really wanted to make the cake with a basket-weave since I think it looks very detailed, but doesn't really take that much effort.  We hadn't covered it in class, but Wilton has quite a few informational videos online, so that was plenty helpful.  I knew I wanted to have lots of spring-themed designs, so I made my drop flowers ahead of time to save on some decoration time.  I was surprised how well they set up over the course of a few days.  By the time I was ready to use them, they were hard enough to pick up and place wherever I wanted them.  I found it very helpful to be able to place the leaves and flowers when I wasn't risking mashing whatever I placed first.


I ended up making it a four layer cake (two eight-inch rounds, each torted).  In between each layer I used a cream cheese icing filling (colored red, since I had it left over from filling our cupcakes for the Wilton class).  I used a classic butter cream icing for the rest of the cake

The basket weave up the sides ended up being simple, but time consuming.  I was SO happy that Chris bought us a decorating turn-table. Next time for the weave I will be doing one "line" of the weave at a time (one vertical line with the crosshatches).  I was too impatient and did a bunch of vertical lines before adding the hatch lines and it was difficult to hide the ends and truly give it the "weaved" look.


I used a piping gel transfer to get the images on the cake since I'm no artist.  I used a combination of the star technique and a round tip to create different textures.  I had a lot of trouble getting the stars to work- I originally thought my icing was too thin, but my Wilton instructor pointed out that I probably was changing the consistency with the heat from my hands.  She suggested keeping two bags of each color ready next time and alternating when it gets too thin.

The rest was incredibly easy- the grass was so simple with tip 233 and stiff icing.  The flowers were a breeze to place!  The end result was what I considered an impressive first attempt!  Definitely some room for improvement on technique, but I was very happy with how it turned out.


My family said it was too pretty to eat, but clearly that was not the case!

Friday, June 17, 2011

Wilton Cake decorating classes in a nut shell

During the month of April Chris and I took a Wilton Cake decorating class at our local Michael's.  It was a lot of fun, but also a ton of work getting ready for each class.  We had four projects throughout the class, one for each week.

For the first class week we brought in plan rolled sugar cookies to decorate.  We practiced making stars with decorating tips (numbers 18 and 21).  Sadly, I did not think to take pictures of these, however they weren't terribly exciting so I don't feel too badly about it.

On week two we practiced torting and icing a cake of our choosing.  Since I'm planning on have red velvet for my wedding cake, I used the opportunity to experiment with different recipes.  I didn't particularly care for this recipe, but it worked well for the class.  Chris chose to go with a tweeked chocolate box cake, which turned out well for him.  For techniques, we practiced using open tips for dimensional shapes (everything on the cupcake image). We had more practice with the stars for boarders.

The top cake is mine, while the one to the right is Chris's. We both had issues getting the icing smooth using the class taught techniques, which was mildly frustrating at the time.  The instructor gave us some pointers, so it went better for us next time.  Unfortunately for Chris his cake took a spill off the counter after being iced in the green.  We patched it up as best we could, but buttercream isn't the most forgiving when you're a beginner... But it get's better!

Week three was an adventure in cupcakes!  I tried another red velvet recipe and ended up really liking it. It was a lot moister than the last one and seemed to have more substance to it.  Possibly a winner, but my search continues. 

 We used a special tip to fill the cupcakes with cream cheese icing and I thought it turned out really well.  We worked on three different flower techniques  and learned how to make leaves.  The mums in blue are Chris's, the yellow is mine (below).  I was not a fan of making mums, but Chris had it down right away. I would blame it on my icing consistency, but really I was just too impatient with it.  I did really enjoy making a variety of drop flowers (the little blue ones) and leaves.


All of our designs were placed on top of a swirled top that resembled a rose.  The effect was really nice- lots of height and definition.    

Our fourth and final project was another cake.  For these cakes, we both stuck our guns for chocolate and red velvet yet again.  I had a cream cheese filling  and Chris used a whipped orange marmalade for his.


We both were clearly having non-creative days with the wording, but we did add two new aspects of decoration.  First, we made the ribbon roses.  They were surprisingly easy and turned out great.  Next, we made a non-existent (in real life) flower, I'm not sure what I think of it.

 Overall it was a great experience.  Our instructor was helpful and we enjoyed ourselves.  I hope to be taking a few more classes before I attempt making my own wedding cake this winter!

-Beth