Saturday, August 27, 2011

Pink Champagne Cake

I recently had one of my younger sisters over for the night.  Being the cool big sister that I am (right...) we baked a cake since there's really not much else to do at my apartment.  We settled on a pink champagne cake.  

The recipe was pretty simple- you start with a box cake mix and add champagne instead of water.  What I had forgotten was just how pathetically thin the layers of a box cake end up being.  Instead of settling for a squat cake I made another batch but decided not to color it pink. In the end, I'm really glad it happened that way because it looked really cool.

Although I didn't realize it at the time, the icing was just a glorified butter cream recipe with champagne instead of water or cream.  When I iced this cake I was frustrated that it didn't crust- only later did it dawn on me that butter cream crusts because of the meringue powder.  I used pureed strawberries as a filling between the layers and iced it with the champagne butter cream.  My sister was very interested in how roses were made, so I decided to make more mini roses and use them on the cake.  I had just learned how to do reverse shells in a cake class so I tried those as well. As seen in the picture I have some work to do, though in my defense, the icing was almost too thin to hold its shape.

In the end, I really liked this cake.  I brought it home when I dropped my sister off and everyone was very approving.  Next time I'll definitely use meringue powder in the butter cream and concentrate a little harder on my shells.
-Beth

Tuesday, August 16, 2011

Orange is the color of the day.

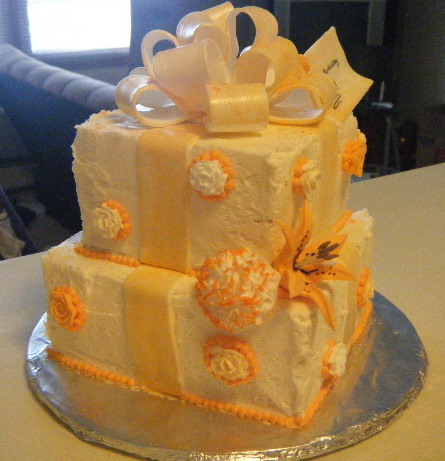
One of my younger sisters recently asked me to make a birthday cake for a friend of hers.  The only request she made was that it be orange.  With that in mind, I also had the opportunity to use a couple of decorations I made in my recent Wilton decorating class.

I used the same almond cake recipe that I had used in my most recent tall cakes and used the same filling (sweetened strawberry puree and sure-gel) since it had turned out so well last time.  I made 2 10inch cakes and 2 8 inch cakes (round) and trimmed them into square cakes that were approximately 7.5 inches and 6 inches.

I realized a few things making square cakes from circles.  First, remember that geometry we learned in high school? Yeah the whole triangles inside circles and Pythagorean theorem thing they swore we would use and we were pretty sure we wouldn't?... Well it turns out that did come in handy. Second, I found out that it's really difficult to get right angles without a reference, and even then if you're the teensiest bit off on each one, you're a whole lot off in the end.  Finally, using butter cream on corners is messy business, but my class instructor just explained a method that I will definitely be trying the next time I do this.

The bow and carnation were things we made in class recently.  To color the bow orange I mixed glimmer dust (edible) with vanilla extract and painted it on.  I wasn't entirely happy with how it turned out, but I had made it white in class so it was either that or thin down some gel colors.  I painted some water onto the tip of all the petals on the carnation and rolled in in the shimmer dust as well.  I used a tip 5 to make all of the dots and tips 5 and 101 to make the mini roses. For the gift tag I used rolled fondant and an edible marker. 

I was not there when the cake was eaten, however my sister assured me that everyone enjoyed it.

-Beth

Saturday, August 13, 2011

Wilton Tall Cakes class

After smoothing over my royal icing disaster
Posting on my "tall cakes" class seems to have eluded my attention up until this point.  In the midst of taking the Wilton flowers class I spent three hours on a Saturday afternoon learning how top properly stack cakes.  I guess I had always assumed that it would be as simple as placing one cake on to of another, however that was not the case. I'm sure with your basic box cake recipe you could safely stack any way you choose, but as soon as you move onto denser cakes and more layers, I can see why you would want more support.

I brought in a 6 inch and an 8 inch double layer cake.  Stacking them included placing dowels in the lower level of the cake (the 8 inch tier) and leaving the top tier on its own cake board.  I also didn't know that to cut a stacked cake, you are supposed to remove each layer before serving it.  Lots of little details.  We were supposed to bring things for decorating to class, so I brought a lot of the flowers from the class I was taking. 

Originally I had planned to do flowers on the top and practice one technique for putting music notes and a staff on the bottom, but using royal icing wasn't as easy as I'd hoped. First of all, I had to kneel on the floor the entire time I was attempting to draw the lines for the staff on.  Second, I either need stronger hands or a thinner icing because it was very hard to lay down an even, steady line. Finally, I had colored the icing with Wilton black gel color and it turned out an oily purple instead of black... In general I just wasn't at all happy with how it was turning out.  I ran out of time in class to finish anyway, but when I got home I scraped the idea and used more flowers.

Because royal icing dries hard, it was relatively easy (with patience) to remove what I had applied to the cake.  A fresh coat of buttercream smoothed over the whole mess.  I finished it off with another cascade of flowers and another round of dimensional dots. 

Final product!
A few more notes about this cake.  First, I still need to work on shells- definitely an improvement over my last attempt, but just not quite there.  Next, I need more practice on centering when I stack, so expect more posts on tall cakes! Finally, I used a recipe given to me by my Wilton instructor and it was great!  I loved how tall the individual layers were and that one recipe made enough for both tiers. For the filling I used pureed strawberries- the end result tasted very much like a strawberry shortcake!  The only thing I would change is the icing I used.  Instead of butter and vanilla flavoring I used almond to match the cake.  It was good, but very sweet (not just my opinion).  Next time I will probably put half the amount called for and use vanilla for the rest.

The top half of the cake was consumed at my staff meeting for once (first time I've brought anything with me) and the bottom half was sent to work with Chris.  Everyone seemed to really like it.

Saturday, July 30, 2011

Irish Soda Bread


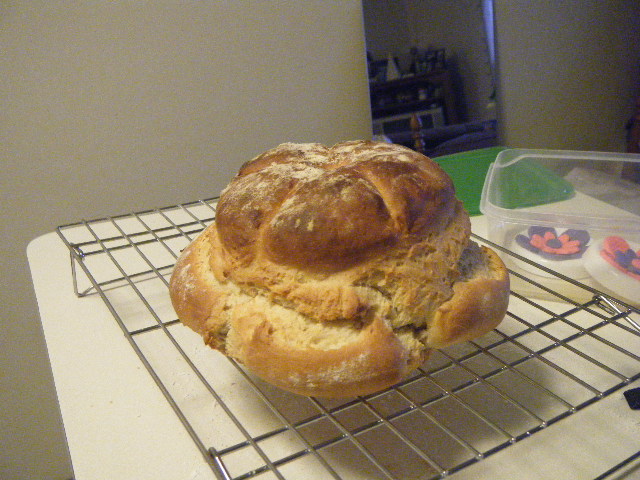
 This is another recipe from the bread book I bought the other day.  I've never tried Irish soda bread before, so I really have no reference as to whether or not the flavor and density were on.  That being said, I did really like it.  I have a soft spot in my heart for crusty breads, and this definitely fit the bill.  This is also the first non-yeast bread I've made and I was impressed how well it rose.


The one issue I had in making it was the stickiness of the dough.  After I added all the required flour it was still unmanageably sticky.  I didn't want to add flour because the directions warned against making dough that was too stiff.  I ended up using a generous amount of flour on my hands when I rolled the dough into balls and that seemed to work alright, but I didn't really get to knead it because it was sticking to everything and any flour on the counter just got worked into the bread right away anyway.  I looked up a video online and the the dough didn't look nearly so sticky so I'm not sure if it was my particular recipe; it's possible it was just really humid that day.  We have had dew points in the70s-80s lately and I know it's really impacted the stiffness of my icing.

-Beth

Friday, July 29, 2011

Roulade (or roll-a-log if you're Chris...)

I made a roulade not too long ago.  It was supposed to have a chestnut filling, but I didn't feel like spending the time or money trying to find chestnut puree so I improvised with what I had on hand. 

Making the roulade itself felt really similar to making a torte- lots of sugar, eggs, and chocolate and not a whole lot else.  I did not have the suggested pan to use, so I just used a baking sheet with deeper sides and that seemed to work.  What I ended up with was what resembled a shallow sheet cake.  I made a filling out of whipping cream, peppermint extract, and a little bit of powdered sugar and cocoa powder.

Rolling the roulade was pretty easy, but I would have liked to let the cake part set for overnight like suggested, since it was really soft.  I didn't end up rolling it as tightly as I would have liked because of that, but it still tasted great.  I sent it to work with a friend of mine who works in a nursing unit and she said everyone liked it there too.

-Beth

A foray into the world of breads


While wandering through Barnes and Noble the other day I came across a marvelous little section of clearance books devoted entirely to the culinary arts. It was a miracle I left with only one book.... In any case, I picked up a book that featured 100 artisan bread recipes.

The first recipe I tried was called "Cottage Bread".  It was a very dense bread and it tasted wonderful smothered in butter. Obviously not a sandwich bread, but very good with dinner.

-Beth

Wilton Flowers and Cake Design in a nutshell

I took another 4 week Wilton course through Michael's in July.  This month was "Flowers and Cake Design".  I really enjoyed the opportunity to learn what even more of the decorating tips I have are used for, and of course the chance to learn how to create a few beautiful flowers.

In the first class we worked on using gum paste and fondant. We made two flowers, a button flower (fanciful) and a pansy (more lifelike).  They were both relatively easy, however it felt almost out of place in the class since we worked with royal icing for the next 3 weeks.

We learned how to make a variety of roses. From left to right pictured below: the Wilton rose, a primrose, and rosebuds. I also improvised an made mini roses.  For some reason the mini ones were a lot easier to make and they turned out adorable.


In addition to the roses, we also worked on apple blossoms, daffodils, violets, and lilies. I found I was decent at making everything except the primroses.  For some reason I never did get the shape of the petals the way I wanted it to look.

We used stiff royal icing for everything.  I think it's a pain to make- it took me the better part of an hour to make a few batches- but it was much easier to work with.  I'm also going to assume that having a stand mixer would definitely speed up the process, or at least make it so I could do  something else while it mixes for ten minutes.

I once made a batch that turned out like fondant.  I'm not quite sure what went wrong, but I plan on using it to frost cookies.  It's almost the consistency of play dough so I should be able to think of something fun to with it.

The last day of class was devoted to decorating our final cakes with all of our flowers and learning a few more flowers not taught during the course of the class. We learned how to make another type of pansy with royal icing and also how to make another version of a mum.

I think I spent the better part of a morning and afternoon making extra flowers to use on the cake.  I tried making a few tiger lilies just to see how it would turn out, and I think it looked pretty realistic. The cakes I've been making lately have been practices for my wedding cake.  I believe I found the recipe I would like to use (it's by Martha Stewart).  Chris even liked it, and he's generally not a fan of cake.  The dimensional dots on the side are also an idea I've been toying with for the cake, only I think I might try it with edible pearls instead.  Overall, I was really please with how this cake turned out.


-Beth